

@nhh Follow
Dienstag, 11. November 2020
I always wanted to write blogs posts. I have great respect for people which are being able to establish a regular schedule on writing. I am reading technical articles or blog posts every day, as there are so many sources for inspiration and learning.
Another thing to mention is, that I really enjoy writing documentations, guides, readmes and so on. I do like it, because most of these, are written in markdown.
Markdown is a human readable markup language, designed for tech people writing consistent looking technical articles. Markdown powers every git readme, thats how awesome it is.
Checkout a markdown cheat sheet for more information about the syntax.
So it was only a matter of time, I get myself to write blog posts.
When I write my blog, I want it to be as lean as it gets. It should have a thumbnail, some meta information and the blog post itself.
I dont want to maintain a whole application. No login, no database. Just files
It should be as undestroyable as it gets.
As always in development, this is a decision.
I end up needing these four files for a whole blog post
post.md
thumbnail.jpg
meta.json
index.php
With that, every folder within my posts folder will become a blog post.
You are currently reading www.niklashanft.com/posts/writing-blog-posts-in-markdown-and-php this results in the following directory structure:
www
    posts
        index.php --> which shows all blogposts
        writing-blog-posts-in-markdown-and-php
            post.md
            thumbnail.jpg
            meta.json
            index.php
Pretty solid, right? We dont have to maintain a database scheme, or update any dependencies (for now).
My www/posts/index.php contains the part for loading several blog posts at once.
<?php $dirs = array_filter(glob('*'), 'is_dir'); ?>

<?php
    usort($dirs, function($a, $b) { return filemtime($a) < filemtime($b); });
?>

<section class="section">
    <div class="container">
        <div class="columns is-multiline">
            <?php foreach($dirs as $name): ?>
                <?php $meta = json_decode(file_get_contents(__DIR__."/".$name."/meta.json"), true); ?>
                <?php if(!$meta['published']) { continue; } ?>

                <div class="column is-half is-offset-one-quarter">
                    <section class="is-thumbnail mb-1">
                        <figure class="image">
                            <img class="is-object-cover is-xs-height" src="/posts/<?php echo $name ?>/thumbnail.jpg" alt="">
                        </figure>
                    </section>
                    <article class="media">
                        <figure class="media-left">
                            <p class="image is-48x48">
                                <img class="is-rounded" src="/assets/images/profile.jpg" alt="Profile picture of niklas hanft">
                            </p>
                        </figure>
                        <div class="media-content">
                            <div class="content">
                                <p>
                                    <a href="<?php echo $meta['url'] ?>"><?php echo $meta['title'] ?></a>
                                    <br>
                                    <small>@<?php echo $meta['author'] ?></small>
                                    <br>
                                    <small><?php echo $meta['createdAt'] ?></small>
                                </p>
                            </div>
                        </div>
                    </article>
                </div>
            <?php endforeach; ?>
        </div>
    </div>
</section>
While this is code isnt pretty, it just works. It loads all folders within the posts directory. It sorts it after its updatedAt time. It displays the content. A little json parsing and we can also have some text preview.
Now lets take a look at the blog post index.php
The index.php loads the blog post via file_get_contents and renders the content within the .content div.
<?php require_once '../../vendor/autoload.php'; ?>

<div class="columns">
    <div class="column is-three-fifths is-offset-one-fifth">
        <div class="content">
            <?php
                $parsedown = new Parsedown();
                echo $parsedown->text(file_get_contents("post.md"));
            ?>
        </div>
        <hr>
    </div>
</div>
I am using https://parsedown.org to parse my markdown posts. You can install it with composer. composer install parsedown
With these components in place, we are able to display our markdown content but there is one thing missing. Code Highlighting
For this task I am using highlight.js. If you installed it, the initHighlightOnLoad should do the rest.
hljs.initHighlightingOnLoad();When using composer dependencies we have to make sure, that the vendor folder gets pushed also to your webspace.
Here is how I do it:
#!/usr/bin/env bash

set -e

rm -rf vendor/

composer install --no-ansi --no-dev --no-interaction --no-plugins --no-progress --no-scripts --no-suggest --optimize-autoloader

rsync -avz -e 'ssh' --exclude='.git/' --exclude='.gitignore' --exclude='composer.json' --exclude='composer.lock' --exclude='.editorconfig' --exclude='bin/' . your-user@your-machine.de:~/public_html/With this litte .htaccess We can achieve pretty solid performance results:
<IfModule mod_expires.c>
    ExpiresActive On
    ExpiresByType text/html "access plus 1 days"
    ExpiresByType image/gif "access plus 30 days"
    ExpiresByType image/ico "access plus 30 days"
    ExpiresByType image/jpeg "access plus 30 days"
    ExpiresByType image/jpg "access plus 30 days"
    ExpiresByType image/png "access plus 30 days"
    ExpiresByType text/css "access plus 30 days"
    ExpiresByType text/javascript "access plus 30 days"
    ExpiresByType application/x-javascript "access plus 30 days"
    ExpiresByType application/javascript "access plus 30 days"
</IfModule>

<IfModule mod_deflate.c>
  # Compress HTML, CSS, JavaScript, Text, XML and fonts
  AddOutputFilterByType DEFLATE application/javascript
  AddOutputFilterByType DEFLATE application/rss+xml
  AddOutputFilterByType DEFLATE application/vnd.ms-fontobject
  AddOutputFilterByType DEFLATE application/x-font
  AddOutputFilterByType DEFLATE application/x-font-opentype
  AddOutputFilterByType DEFLATE application/x-font-otf
  AddOutputFilterByType DEFLATE application/x-font-truetype
  AddOutputFilterByType DEFLATE application/x-font-ttf
  AddOutputFilterByType DEFLATE application/x-javascript
  AddOutputFilterByType DEFLATE application/xhtml+xml
  AddOutputFilterByType DEFLATE application/xml
  AddOutputFilterByType DEFLATE font/opentype
  AddOutputFilterByType DEFLATE font/otf
  AddOutputFilterByType DEFLATE font/ttf
  AddOutputFilterByType DEFLATE image/svg+xml
  AddOutputFilterByType DEFLATE image/x-icon
  AddOutputFilterByType DEFLATE text/css
  AddOutputFilterByType DEFLATE text/html
  AddOutputFilterByType DEFLATE text/javascript
  AddOutputFilterByType DEFLATE text/plain
  AddOutputFilterByType DEFLATE text/xml

  # Remove browser bugs (only needed for really old browsers)
  BrowserMatch ^Mozilla/4 gzip-only-text/html
  BrowserMatch ^Mozilla/4\.0[678] no-gzip
  BrowserMatch \bMSIE !no-gzip !gzip-only-text/html
  Header append Vary User-Agent
</IfModule>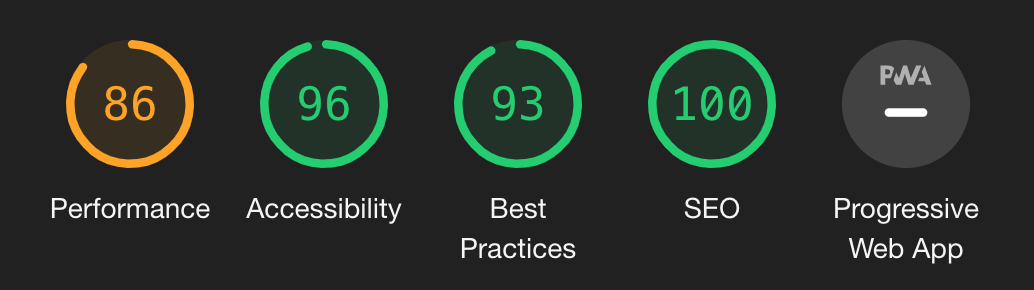
While this solution wont win a price for elegance, it is serving my needs really well. I dont want to maintain wordpress, I also want to be free to add my own little magic as I go